« March 2012 | Main | October 2012 »
June 16, 2012
iPhone 3GS battery replacement: not for the timid
With millions of people replacing their older iPhones with newer ones, what happens to the old ones? Well, some are sold to one of the several used electronics merchandisers, others directly on eBay, or they may be passed on to friends or family less obsessed with having the latest and greatest. Many iPhone users simply keep their old one, either letting it gather dusk in a drawer somewhere, or perhaps actually using it via WiFi as a fancy iPod Touch. But there is one problem with older iPhones: the battery.
Like the rechargeable batteries in laptops and other electronic devices, the battery in every iPhone gradually loses its ability to hold a charge. Apple says that "a properly maintained iPhone battery is designed to retain up to 80% of its original capacity at 400 full charge and discharge cycles." A full charge cycle means charging the battery, then letting it completely run dry. Most phone users, of course, put their phone on charge long before the battery is dead, so how many charge cycles a battery has on it is difficult to tell. And do note that lithium-based batteries like to be used, or they'll lose their capacity to recharge sooner.
What all this means is that the battery in most used iPhones will be close to the end of its useful life, resulting in ever less battery life per charge (see Apple's battery page]. Unfortunately, the iPhone battery isn't user-replaceable and there isn't a conventional battery compartment. So when the battery needs to be replaced, the phone has to be sent to Apple. The charge as of mid-2012 is US$79 plus US$6.95 shipping (see Apple's battery replacement page). That's pretty costly just to replace a phone battery. Which means there is a 3rd party market for iPhone replacement batteries.
If you google iPhone replacement batteries you'll find that you can get one for about US$20 from places that specialize on iPhone batteries and claim that their batteries are direct replacements of the original. If you go on eBay, you'll find battery and tool sets for as little as six dollars, shipping included, and that's from vendors shipping from the US and with very high eBay ratings. That's what I found when my old iPhone 3Gs, sitting mostly idle since I had gotten a new 4S a few months ago, obviously needed a new battery. I couldn't sell my old iPhone as it had a small but of glass chipped of the side of its display. It still worked perfectly well with all my apps on it, but the battery went dead so quickly that it really wasn't usable any longer.
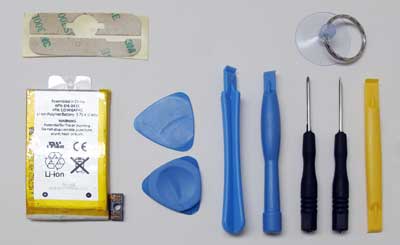 So I ordered a six dollar replacement on eBay. It quickly arrived and even came with set of tools that included two screw drivers, four plastic extraction tools that help opening electronics without scratching them, a suction cup with keyring, and some 3M pre-cut sticky film, presumably to replace original stickies or glue. There weren't any instructions, but those are easy to google.
The process of replacing an iPhone battery goes something like this: you remove two tiny screws to the left and right of the iPhone's charging connector, use a tool to pry the screen part off the housing, unclip about seven tiny connector, undo about seven tiny screws that hold the system board in place, take the system board out, and then replace the battery that sits beneath the system board. Sounds easy, but it is definitely not for the faint of heart and, honestly, beyond the micro-dexterity skills of most. I am not going to document everything with pictures as they are easy to find online.
The first challenge is to pry the screen loose. Do-It-Yourself tutorials on the web usually recommend using one of the plastic prying tools and some even show an Exacto knife. In my experience, the plastic tools don't easily fit into the very narrow gap between the glass and the housing and they are too soft to pry, and anything metal will leave marks on the phone. What worked for me was the suction cup with the keyring to pull. It requires a rather firm pull to get the display loose, and you have to guard against ripping the whole screen off once it lets go as that might tear some of the fragile tiny ribbon cables inside.
Once the screen is loose it'll still be connected to the main part of the phone with three ribbons. Matters are helped greatly by tiny labels with the numbers 1 to 7 on it, which is the sequence in which the ribbon and cable connectors are to be undone. There are also seven tiny crews holding the system board in place, one of which is covered with a sticky label that warns not to remove it. But you have to if you want to get the system board out.
Once all seven connectors are off and all the screws out, it's a matter of lifting out the system board (don't forget to remove the tiny screw that holds the camera assembly in place). Now everything comes out and you see the battery, which doesn't come off easy either because it's stuck to the housing with a piece of double-sided tape. You have to be careful in prying the battery loose or either the battery of the housing could get damaged.
Putting the replacement battery in is a piece of cake. And putting everything back together isn't too difficult either, except that, as is always the case when you take apart and put back together small electronics, you need to pay great attention to do everything in the right order, and without breaking anything. Reattaching the seven little ribbon and other connectors requires a very steady hand and triple-checking everything. One tiny ribbon, especially, is a total pain, with a super-fragile connector and no seeming way to secure it other than pushing it back in its place with tweezers, not knowing if it's in properly.
Once all connectors and screws seemed back in their proper places, I couldn't really see how I needed the replacement pre-cut sticky film as the screen fit back into the hosting and seemed to seal tightly. Put the two screws back in and the old iPhone looked and felt none the less for wear.
But would it start up with the new battery? It did. Came right up and all my data and apps were still there even though the battery had been disconnected for several minutes. I plugged the phone in to fully charge the battery. All was well. Or so I thought.
A while later I took the now fully charged (almost fully; the new battery somehow didn't seem to reach a point where the iPhone battery meter showed 100%) phone and began checking the apps. All worked. But then I got a message suggesting I upgrade my system software. I accepted and the iPhone began to wirelessly update its software. And soon showed the dreaded "plug me into iTunes" icon. I did and it wasn't pretty.
While the phone had worked perfectly well before the prompted software update, iTunes now claimed the phone needed to be restored to its original state and I could later sync to get data and settings from my backup. I had no choice than to proceed. iTunes went through the process of downloading and installing the system software, then loaded firmware and was done. The phone, though, wasn't, and suddenly there was an "unknown error (29)" message on iTunes, and iTunes declared this phone could not be restored. Ouch, ouch, ouch.
So I took it apart again (the second time is so much easier) to make sure I hadn't missed a connector or destroyed something. All seemed well, but upon reassembly, the phone wanted iTunes again, and the iTunes software reload resulted in the same error. So the phone was now unusable.
I googled the situation and eventually found a page that said "Buying or replacing a 3GS battery from anyone/anyplace other than Apple is a hit-and-miss experience" (see here). The author claimed that some batteries will work and others will result in the "unknown error (29)." His conclusion was that an unknown or out-of-date battery APN part number caused the problem, with something in Apple's software generating the iTunes restore error. The page listed known good APN numbers, and my replacement battery was listed as working properly. But it didn't.
So I took it all apart again and put the old battery back in, figuring if the phone now restored properly, I had not damaged anything. And sure enough, iTunes now finished the restore, reloaded data from a backup and the phone was back to normal (minus the data I had accumulated since the last backup).
What is weird here is that the phone had worked just fine with the new battery before the iPhone requested a software upgrade. If the battery were bad, it would not have worked at all. But it did. After the software upgrade, the phone no longer restored with the new battery and became useless. It almost seemed as if the software upgrade refused the replacement battery that the older (but still iOS 5) software had accepted.
So what's the moral of the story? First, if you have the manual dexterity to work on tiny electronics, replacing an iPhone battery is not very difficult, but there is plenty of possibility to mess things up. So this is strictly a do it at your own risk proposition. Replacement batteries that look pretty much identical to the OEM battery are available for very title money on eBay and elsewhere, including tools. The price difference between the six bucks they cost and the 80+ dollars that Apple charges is very large. But apparently, the iPhone software decides which batteries will work and which won't.
===========
After this first experience with my old iPhone 3GS, I then tackled my wife's old iPhone 3G whose battery was pretty much dead and held a charge for just half an hour or so. As is so often the case with working on electronics (or cars, for that matter), the first time taking something apart and putting it back together is tough, but a second or third time is much easier. This time I never even tried to pry the screen off the iPhone with a tool that could potentially damage the phone; I simply used the suction cup to easily lift the display off the phone.
Inside, the iPhone 3G is almost identical with the 3GS, so if you know how to work on one, you know how to work on the other. If anything, the 3G is a bit easier because some of the tiny connectors reconnect easier. Opening the iPhone 3G, replacing the battery, and putting it back together took no more than ten minutes. Once together, it worked just fine and, so far, hasn't asked for a software upgrade. And given my experience with the 3GS software update that disabled the newly installed battery, I won't upgrade the 3G.
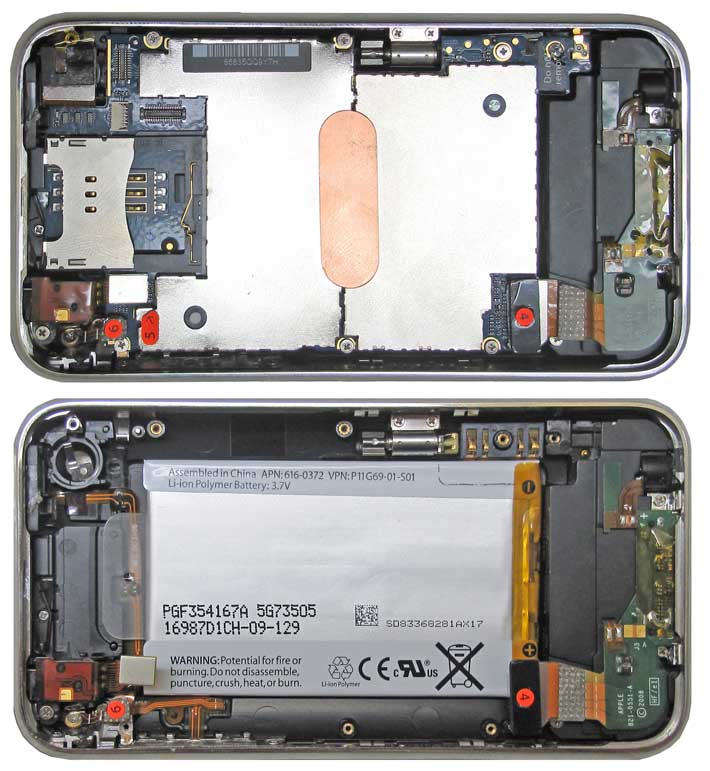
Below you can see what the 3G looks like inside. On top a view onto the system board, at the bottom a view onto the battery, with the system board removed.
==========
Update: Upon being contacted, the eBay seller of the 3GS battery (DaledGroup) said that every now and then they have a bad battery. He promptly replaced it with another one (APN 616-0434 instead of the 616-0435 that gave us trouble). That battery worked flawlessly, and also seems to hold its charge very well.
The 3G battery from trimming on the other hand, while working fine in the 3GS, loses its charge very quickly.
Posted by conradb212 at 07:35 AM | Comments (0)